You get to spend lots of time snuggling on the couch watching Arrested Development. Oh, and being in love and all of that stuff.
You also get to use way sweet gifts like this:
It is oh-so-awesome. (Forgive the awkward cordage. I have since organized the kitchen.)
We have been married a little over a month now. Crazy! Time really does fly. Nothing much new, I'm still on the job search and it snowed four inches last night.
It felt so much like Christmas, that Matthew made a cocktail to celebrate...
It was ...interesting. Surprisingly enough, not too bad. We called the drink a Big Rump.
Speaking of drinks: Jones Soda! (nice segue, eh?)
(SIL personal photo jacked from facebook)
Now... I haven't spent much time thinking of the wedding after the actual wedding (which is saying something, because I did A LOT of thinking about the wedding in the months leading up to it...) However, I did have a couple of people ask how (and, probably why...) I made our wedding favors. I also had someone doubt that I actually made them. So bear with me I as I show (and prove!) how I made our Wedding Soda Favors.
Step One:
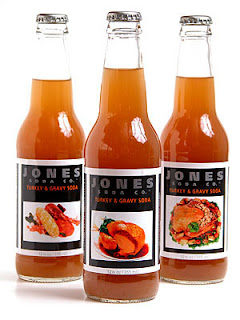
Use your rudimentary knowledge of Publisher (or PhotoShop, if you want to get fancy) to design a template that looks something like this:
Ah, Turkey & Gravy, a holiday staple.
I edited mine with our last name, some corny "ingredients" (love, laughter, friendship, and other syrupy words), our wedding date as the barcode, and a little thank you message to our guests for sitting through an hour long Catholic ceremony for us.
Step Two:
Buy a bunch of Jones Soda. We went to the Dallas Arts District and bought in bulk. (bulk = KILLER savings)
Step Three:
Buy Glee: Season One on DVD.
Seriously. This helps, because mindlessly ripping off and assembling lables on a Saturday afternoon when nothing is on is no fun. Mindlessly ripping off and assembling labels to way awesome remakes of already classic tunes? Super fun.
Step Four:
Remove labels.
Easy enough. Quite time consuming, but they actually peel off very easily.
Step Five:
Put on the labels.
I had mine printed on paper that was entirely sticky. Yuck. This made putting on the labels (and taking them off when they were cattiwampus) a pain. Eventually I was so frustrated that I kept them crooked and hoped no one would notice... I apologize to any and all guests who DID notice my sloppy label work. I would definitely suggest using a paper that had only a stip of adhesive as opposed to an entire page of stickiness.
Step Six:
Okay, so not really a step, but another suggestion. Garbage bowl!
This idea was totally jacked from Rachel Ray, but it works really well.
(source)
I used it to collect the garbage and recycle. (PS: despite my plug for recycling, this project is not, in any shape or form, environmentally friendly)
Step Seven:
And repeat! Ta-da! You have 225 personalized favors.
In seven (differing degrees) of delicious flavors!
Now sit back and watch your guests enjoy!
What's that? Oh, I snagged a couple for the road!
(all the photos stolen from family and friends via facebook)
This was very lengthy and picture-heavy. I'll get back to Thank You cards now... =)


